Tuesday, December 28, 2010

Mug Rug & Decor Elements

This should be my last "Christmas" post. Decor elements were used on this mug and then I created a rug mug from SU's material by cutting it in the Big Shot with the scallop square die. I placed batting between the two pieces of material and then sewed by hand a little "x" with linen thread in each corner, added a button that can be found in the holiday mini and was done! You don't need to know how to sew to do this:)

I will have some birthday and Valentine's cards and projects coming soon, so make sure you check back.




Sunday, December 26, 2010

Christmas Decor Elements

First, let me apologize for the quality of these pictures. I could not get a good picture without the glare and then I could not get the platter so it was pictured on the side:(

I purchased the bowl and platter at Target and then decorated them using Decor Elements that are found in the Holiday mini catalog. They are so easy to apply. I have another mug that I applied decor elements to that I will be posting soon.


Saturday, December 25, 2010

Merry Christmas!

Merry Christmas to each of you! Have a wonderful day celebrating the birth of Jesus with your loved ones.


Thursday, December 23, 2010

Candy Cane Paint Can

This is one of my favorite 3-d items that I created this year. I took a clear paint can (found at craft stores) and put a candy cane decor element on it (the decor element is from the holiday mini). I simply cut a real red circle to cover the top, punched out a snowflake and used two way glue on it to add glitter. Ribbons were tied around the handle and a washer is tied to the side to open the can. I filled this one with whoppers, because I really like brown, red and white. This is an easy project. The only thing that takes some time is tying the ribbons, but it is a good task for in front of the t.v.!

Merry Christmas Eve:)


Tuesday, December 21, 2010

Rudolph!

Rudolph the red nose reindeer had a very shiny nose.....

My kids are waiting for Rudolph to bring Santa to our house and they won't have to wait much longer as Santa will be dropping the gifts off Wednesday night!

This "Rudolph" is a project we made in my daughter's class year for their Christmas party. As you can see it uses many different circle punches and the scallop circle punch. The chocolate chip card stock is wrapped around a Hershey candy bar. It's so cute and fun to make.


Monday, December 20, 2010

Soft Suede Christmas

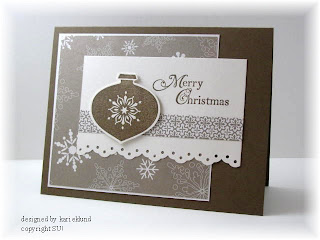
This is one style of Christmas card that I sent out this year. It uses retired designer paper. The paper was beautiful as it had a shimmer to it. The main card stock is soft suede and the white is shimmer white which went well with the designer paper. The ornament is stamped in soft suede ink and punched out using the ornament punch. I don't think there is a card I make that I don't use either punches or the Big Shot! The countdown to Christmas is on and I'm crossing things off of my to-do list, however, there is still more than enough for me to finish!

Thursday, December 16, 2010

Monogram Ornament

4 Days in a row posting! Yeah:) I really have been stamping, I just haven't been posting....

It was hard to get a good picture of this with a shiny surface, but trust me when I say it looks better in person! I made a monogram for each person in my family and used colors that fit their personality. This one pictured is for my husband, Steve, hence the "s". To make these, use the Big Shot with the Timeless Type Alphabet dies and vinyl. On this particular one, I used the clear vinyl so the letter looks like it is etched on it. I then tied ribbon on the top and that's it! If you decide to make these, I will warn you that it is a little tricky with the rounded surface and you have to make sure the bulb is big enough. In case you are curious and want to know, for me I did a brown ornament with a clear "k", Lily's ornament was silver with a turquoise "l", a red ornament and a white "n" for Noah, and Carter's ornament was silver with a red "c".

Thanks for stopping by my blog!


Wednesday, December 15, 2010

2010 Dominos

Some of you have seen these before, but I wanted to show you my 2010 version! If you have never made these, here are the directions....find an image that will fit on a domino, ink it up with black staz on ink, color in the image with a permanent marker (I use sharpies) and then apply crystal effects over the image. Once the crystal effects is dry, put sticky strip around the outside of the domino, attach ribbon, tie the ribbon at the top of the domino in a knot and then tie another knot at the end of the ribbon to make a loop for hanging on the tree. I like to tie these to the outside of gift bags. They are fun to make, easy and the recipients enjoy them! I am actually having my son's 2nd grade class make these at their Christmas party. I stamped on the domino for them, since the surface is a little slippery. Have fun making these!


A suggestion...even those these particular ones are ornaments, you could turn them into magnets or even necklaces. You don't need to be limited to Christmas and Christmas images!


Tuesday, December 14, 2010

Individual Smore

Aren't these the cutest things ever?!? They are individual smore packets. I used a small ziploc bag from a craft store to hold the 2 graham crackers, candy bar and snowman marshmallow peep. The topper was easy peasy to make using the scallop square die for the Big Shot (my all time favorite tool!). I then tied a ribbon and added a button. On the back, I attached directions....place one graham cracker on a plate and then layer the chocolate bar and peep on top. Heat in the microwave for approximately 25 seconds, take out and smoosh the other graham cracker on top....Enjoy! These make cute gifts. My kids love to watch the snowman grow big in the microwave.

Sunday, December 12, 2010

Candy Cones

I can't believe that it has been a month since I last posted! Where has the time gone? I have many projects to show you, I just need to get the pictures taken and a little "blurb" written up for each one:)

Are you looking for an easy, but cute packaging for candy or other little items? Then, these "candy cones" may be the answer. You can either make them simple or jazz them up with accessories. To make, cut a piece of designer paper 6x6 and then roll it! Attach the two sides using sticky strip and then decorate. These would also work well to place on the table at each person's table setting at Christmas. Let me know if you make any.


Thursday, November 11, 2010

Demonstrator Starter Kit 50% Off!


What do you call it when you get over $310 in crafting and business supplies for only $87.50? Call it Simply Amazing! From November 15-30, you can purchase either the Standard or Digital+Starter Kits at 50% off the regular retail price of $175 (plus free shipping!), and enjoy these great benefits as a Stampin' Up! demonstrator.

  • Earn additional income while sharing creativity.
  • Make new and lasting friendships.
  • Enjoy access to nearly unlimited creative ideas.
  • Receive a free subscription to an exclusive monthly magazine.
  • Receive two free months subscription to your own business website.
  • Opportunity to earn free products and incentive trips.

THIS IRRESISTIBLE OFFER IS ONLY AVAILABLE UNTIL NOVEMBER 30,2010, SO CONTACT ME BEFORE IT'S TOO LATE!


email: karieklundstamps@gmail.com

website: http://www.karieklund.stampinup.net/


Wednesday, November 10, 2010

Same Layout, Different Colors

These two Christmas cards are the same except for the colors I used. I participated in a swap and was debating between these two. Guess which one won.....yes, the espresso and cherry cobbler card. My favorite color is brown and I use it A LOT on my cards and projects!

I ran the top layer of the card through the Northern Flurry Embossing Folder and then sponged the snowflakes with white craft ink and added the pearls. I placed a strip of sticky strip across the card and then adhered the seam binding by gathering and folding. Merry Christmas was stamped and then punched out with the decorative label punch.


Wednesday, November 3, 2010

Christmas Stamp-a-Stack

Below are pictures of Christmas cards that will be made at my upcoming Stamp-a-Stack class. Many of them were inspired by other stampers.
Scroll all the way down for a last Halloween project:) I know, it's November, but I didn't get it posted earlier!


This is a 1 x 1 1/4 Simply Adorned Charm. The great thing about the charms is that you can make inserts and switch them out. You can always have a necklace that matches your outfit! I made this Halloween insert and wore it to Noah's Halloween party. Many people commented on it. I just did a swap, so I will show you some other fabulous inserts in the future. Would you like a class on this?


Sunday, October 31, 2010

Happy Halloween

The cards I'm sharing with you today are cards that I received in a swap. These two SU demos did a fabulous job.

The first card was stamped by SU! demo Sandy Carlson. Take note of the ghosts, because they were made with the owl punch! To make, punch the owl out and then turn it upside down and you have a ghost:) This card is full of punches as the pumpkins were made from the oval punch and circle punch. The black was embossed using the Spider Web embossing folder and then it was sprayed with smooch spritz to make it sparkle. This second card was made by SU! demo Terri Gaines. I love her unique fold, attention to detail and the surprise once you open it. She also used smooch spritz on the Spider Web embossed image. When you open the card, the moon with the bats pop out! It was hard to photograph, but I hope you can see it.


Friday, October 29, 2010

Big Shot Sunflower

Here is a project I made for some teachers and the secretaries at my kids' school. The Sunflower was cut using the Flower Folds die and then dry embossed using the polka dot embossing folder. I then put sunflowers in a sweet treat cup and attached it to the sunflower. A 1 3/4" circle was punched out of chocolate chip card stock and then I punched with the 2 3/8" scallop around the open circle to get the "border" around the center of the flower. This covered up the plastic ring from the sweet treat cup. For the stem, I wrapped a lollipop stick with ribbon. The flower was placed in a container and filled with the fall m&m's (I just love how they match the SU colors!). "Just for You" was stamped using the Teeny Tiny Wishes set and then punched out with the word window punch and layered onto a piece of cherry cobbler card stock that was punched with the modern label punch.

Halloween Deco

Today, I'm going in to Noah's classroom for his party and am bringing some treats. So, my dilemma was to just bring the treats, buy a Halloween dish to put the items in or try to make something. Well, you guessed it, I wanted to be a little creative! When I was shopping, I found buckets at Michael's for $1.00 each (the perfect price for me). Yes, they were just plain, but I figured I could fancy them up a bit. I took my Big Shot and some sheets of decor elements (SU sells plain sheets of decor elements) and cut out some letters using the Bigz Alphabet Simple Letters and punched some bats using the Bitty Bat Large Punch . Please be aware, though, that not all punches work with the decor elements sheets...if there is fine detail (i.e. snowflake punch) you will not be able to get it to cut the decor element sheets.

Carter is excited because he wants new pails for his sandbox and that is what we will probably do with them after Halloween since the decor elements just peel right off!


Think of all the possibilities for personalizing items....for birthday parties, on plates, mugs, paint cans, etc.

Below are some before and after pictures.


Tuesday, October 19, 2010

Handmade Holiday Sale

Check out Holiday Bundles that are on sale on my website http://www.karieklund.stampinup.net. You can order right from my site or contact me for help.

Thursday, October 7, 2010

WIN TWINS!

As you know we are Twins fans and last night they lost their first playoff game to the Yankees. We are cheering for a win tonight! Lily's teacher is a BIG Twins fan and her favorite player is Michael Cuddyer (#5). So, this morning I made up a popcorn package for Lily to bring to her. This is just like the Halloween candy bar pull that we made at the Halloween class, except bigger to accomodate the microwave popcorn bag. The word "twins" was die cut with the SU Simple Alphabet Bigz dies. (Note the "win" is in white:) I think you probably figured it out, because even Noah caught on to the play on the word Twins.) I used sticky strip on the bottom and then crimped it, tied the ribbon around the popcorn and had to put the #5 for Michael Cuddyer on the back. I'm waiting for the report from Lily to see if her teacher liked it:)


Tuesday, October 5, 2010

Stampin' Up! - Clearance Rack Blitz


From October 5-18, we're adding over two hundred more discontinued items--some at up to 80 percent off--to help us make room in the Distribution Center for new products!

Things to know about the Clearance Rack Blitz:

  • Orders for Clearance Rack items can be placed through the Online Store or through me personally.
  • Qualifying orders are eligible for hostess benefits/Stampin' Rewards.
  • While the Blitz lasts from October 5-18, some items, depending on availability, may be made available in the Clearance Rack in the future.
  • All discontinued items are available only while supplies last.
  • All sales of discontinued items are final.

If you need any help, let me know.

Monday, October 4, 2010

Halloween Class

The projects below will be made at my Halloween Class on Wednesday, Oct 6 from 7-9. RSVP if you would like to come or if want more details, contact me!


Friday, September 24, 2010

Just Believe and Crochet Trim

This is a CASE from Andrea Walford. I loved the simplicity of this card. The flowers were stamped in vanilla craft ink on cherry cobbler card stock. The label was made using the Big Shot and Matchbook die, but the Decorative Label punch in the Holiday Mini is almost the exact same shape and would make it easier...stamp and then punch! I LOVE my punches:)

Tip: If you have a vanilla craft pad and haven't used it for awhile, the color may have separated and it won't work well for you. To get it back to "working" condition, take a plastic spoon and "smoosh" it over the top of the stamp pad until you have the color worked back in .

Thursday, September 23, 2010

Same, but Different

These 2 cards have the exact same layout, both use the same colors and the stamp set Just Believe, but the technique used on each makes them different! This card was sprayed with vanilla smooch spritz which makes it shimmery. A rhinestone was placed in the middle of the one flower to go along with the shimmer look.
This card I distressed and has a vintage feel to it. I inked up a sponge in chocolate chip and ran it across the embossed vintage wallpaper on the marina mist card stock. A pearl was placed in the middle of the flower and chantilly crochet trim was tied around the flower image panel.
My club gals made this at stamp club a couple of weeks ago. They got to choose which style they made, since I like them both and couldn't make up my mind! Do you like one better than the other?


Sunday, September 19, 2010

Colour Q Challenge #50

I made these two cards using the Color Challenge found here. Once again, I was too late uploading to be considered in the challenge, but thought you may like to see these cards. I used the Season of Friendship stamp set and on the first card used a punch from the Itty Bitty Shapes Punch pack. Thanks for looking!


Thursday, September 16, 2010

Inkspirations Challenge #39


So, I made this card for the Inkspirations Challenge #39 that is found here, but as I went to find out how to link it to the site, I realized that the challenge was already closed! The stamper that hosts this challenge lives in Australia, so their Thursday at midnight is different from the U.S. Thursday at midnight:) Oh well, I got a card made and had fun doing it:) This card uses the Halloween set, Wicked Cool. I took the idea from the Idea Book & Catalog to ruffle the ribbon around the stamped image. I like the look, but it was more challenging than I thought it would be! Maybe with more practice I would become better and faster at it.

Wednesday, September 15, 2010

Just Believe in Daffodil

This card was created with the Just Believe set with the flowers stamped in Daffodil Delight ink. The Whisper White card stock was embossed with the Vintage Wallpaper embossing folder. A pearl was added to the flower (I love the pearls and rhinetstones!). I used the 1/8" taffeta ribbon. I wasn't too sure about the 1/8" size of this, but I know now I need to get this type of ribbon in more colors:)