Showing posts with label Big Shot. Show all posts
Thursday, May 10, 2012
Razzleberry Fifth Avenue Floral
I must be on a Rich Razzleberry "kick" as the card I made yesterday also used this as the primary color! This card was made at my stamp club last week. It uses one of my favorite sets, Fifth Avenue Floral which is retiring:( The Movers and Shapers die was used to create the "cut-out". That die is retiring, too. This round of retirements, I had a lot of my favorites that are retiring. I guess I'll have to find some new faves.
Stamp Clubs: Are you interested in joining a stamp club? I will have new ones starting in June! At stamp club, you agree to purchase $25.00 (subtotal) of product six times per year. One of the months, you will receive the hostess benefits. On the club dates, you make 3-4 cards that I have prepared for you. We meet at my house.
If you do not live close, you can choose to do the online stamp club. For the online stamp club, you place an order online six times. I will make the club cards and mail to you. There will be a one time fee of $12.00. You choose one of the hostess sets that will be mailed to you at the end of your commitment.
Email me (karieklundstamps@gmail.com) to join a club and find out more information!
Card supplies:
Cardstock: Rich Razzleberry, Whisper White, Pretty in Pink Designer Paper
Stamp Sets: Fifth Avenue Floral, Perfect Punches, Petite Pairs
Ink: Pretty in Pink, Rich Razzleberry, Early Espresso
Accessories: Early Espresso Grosgrain, Rhinestones, Curly Label Punch, Movers and Shapers Die, Itty Bitty Shapes Punch Pack
Monday, April 16, 2012
Oval Punch Flower
This card uses the sketch layout from Freshly Made Sketches (FMS #30) and the color is from the photo inspiration found at Just Add Ink (JAI 113). I would not have put these colors together, but I really like the combo!
Cardstock: Sahara Sand, Calypso Coral, Pool Party
Ink: Staz On
Stamp Set: Curly Cute
Accesories: Oval Punch, Circle Punch, Pool Party Seam Binding, Adorning Accents Die and Embossing Folder, Elegant Lines and Perfect Polka Dots Embossing Folder, Brad from SAB
Monday, April 9, 2012
Butterfly and Scallops
This card used the colors in the Color Challenge found at HSS. Unfortunately, I was too late to link up! The sketch is from Clean and Simple FTL 184. The colors of the scallops are Pretty in Pink, Early Espresso and Rich Razzleberry. I used the Tasteful Trim die to make the scallops. The butterfly is from the Butterfly embossilit. I added a pearl to the center of the butterfly and the pennant was die cut from the Petal Cone Die. I stamped thank you in early espresso ink and sponged the edges in crumb cake. The base of the card is Very Vanilla.
I know I have been MIA! Thanks to those of you who have been not given up on me and have been checking by blog. I have been subbing as much as I can, the kids have started up with soccer, and I made prom invites and invitations for another event. So, my stamping "just for fun" has not been happening. I hope to get back into it.
Friday, January 27, 2012
Framelits Birthday
This card uses the Enchantment Designer Paper that is in the sale-a-bration catalog. The base is Soft Suede. The Framelits Label Die was used as well as the Butterfly Embossilits. The Happy Birthday is from the stamp set Curly Cute. Soft Suede ribbon was ruffled in the middle of the card.
I apologize for those of you who checked my blog yesterday for a new post. I had my first sub job yesterday and then my Valentine's Day class last night, so I didn't have time to get this up. I hope to get some stamping done this weekend as there are many challenges that I would like to participate in! They are fun and if you haven't tried them, give them a shot. They get your creative juices flowing.
Monday, January 23, 2012
Sale-a-bration!!!
Sale-a-bration begins! One of my favorite items from the sale-a-bration catalog is the Enchantment Designer Paper which is used on this card. And, as most of you know, my other favorite item is the Big Shot. The Big Shot is not in the sale-a-bration catalog, but it is a good time to buy it since you can get some free items during sale-a-bration. The scallop circle and butterflies were all die cut using the Big Shot. I used an Edgelit and Adorning Accent Embossing Folder to make the cut and embossing on the side. This card uses the sketch challenge from Stamping 411, SCC 239, found here.
Thursday, January 12, 2012
Double Digit B-day & SFF123011
This sketch is from Sketch Frenzy Friday 123011 found here. The tag and the number 10 are made using dies in the Big Shot. The turquoise card was ran through the Big Shot to emboss it using the Lattice Embossing Folder. I used some retired stamp sets for the b-ball, soccer ball and "champ." The other stamps are from the stamp set Extreme Elements. I made this card to give to Lily when she turns 10 in March. This may look like a "boy" card, but my girl is a "tomboy" and is proud of it. She loves basketball, soccer and bright colors, so I think this card is perfect for her.
Monday, December 26, 2011
Scraps
Every time I have a class, I cut extra for me to make up cards. Well, I now have multiple boxes of card stock cut of cards and projects that I have cut for, but I have not finished. The card below was made from some of the pieces found in one my boxes. I had the card stock embossed and the flower die-cut. I just had to add the button and stamped a greeting inside. It took just a few minutes, and I wonder why I didn't do this earlier!
The kids are on break this week, so there may be few posts this week if any at all.
Friday, December 23, 2011
Christmas Gifts Day 2
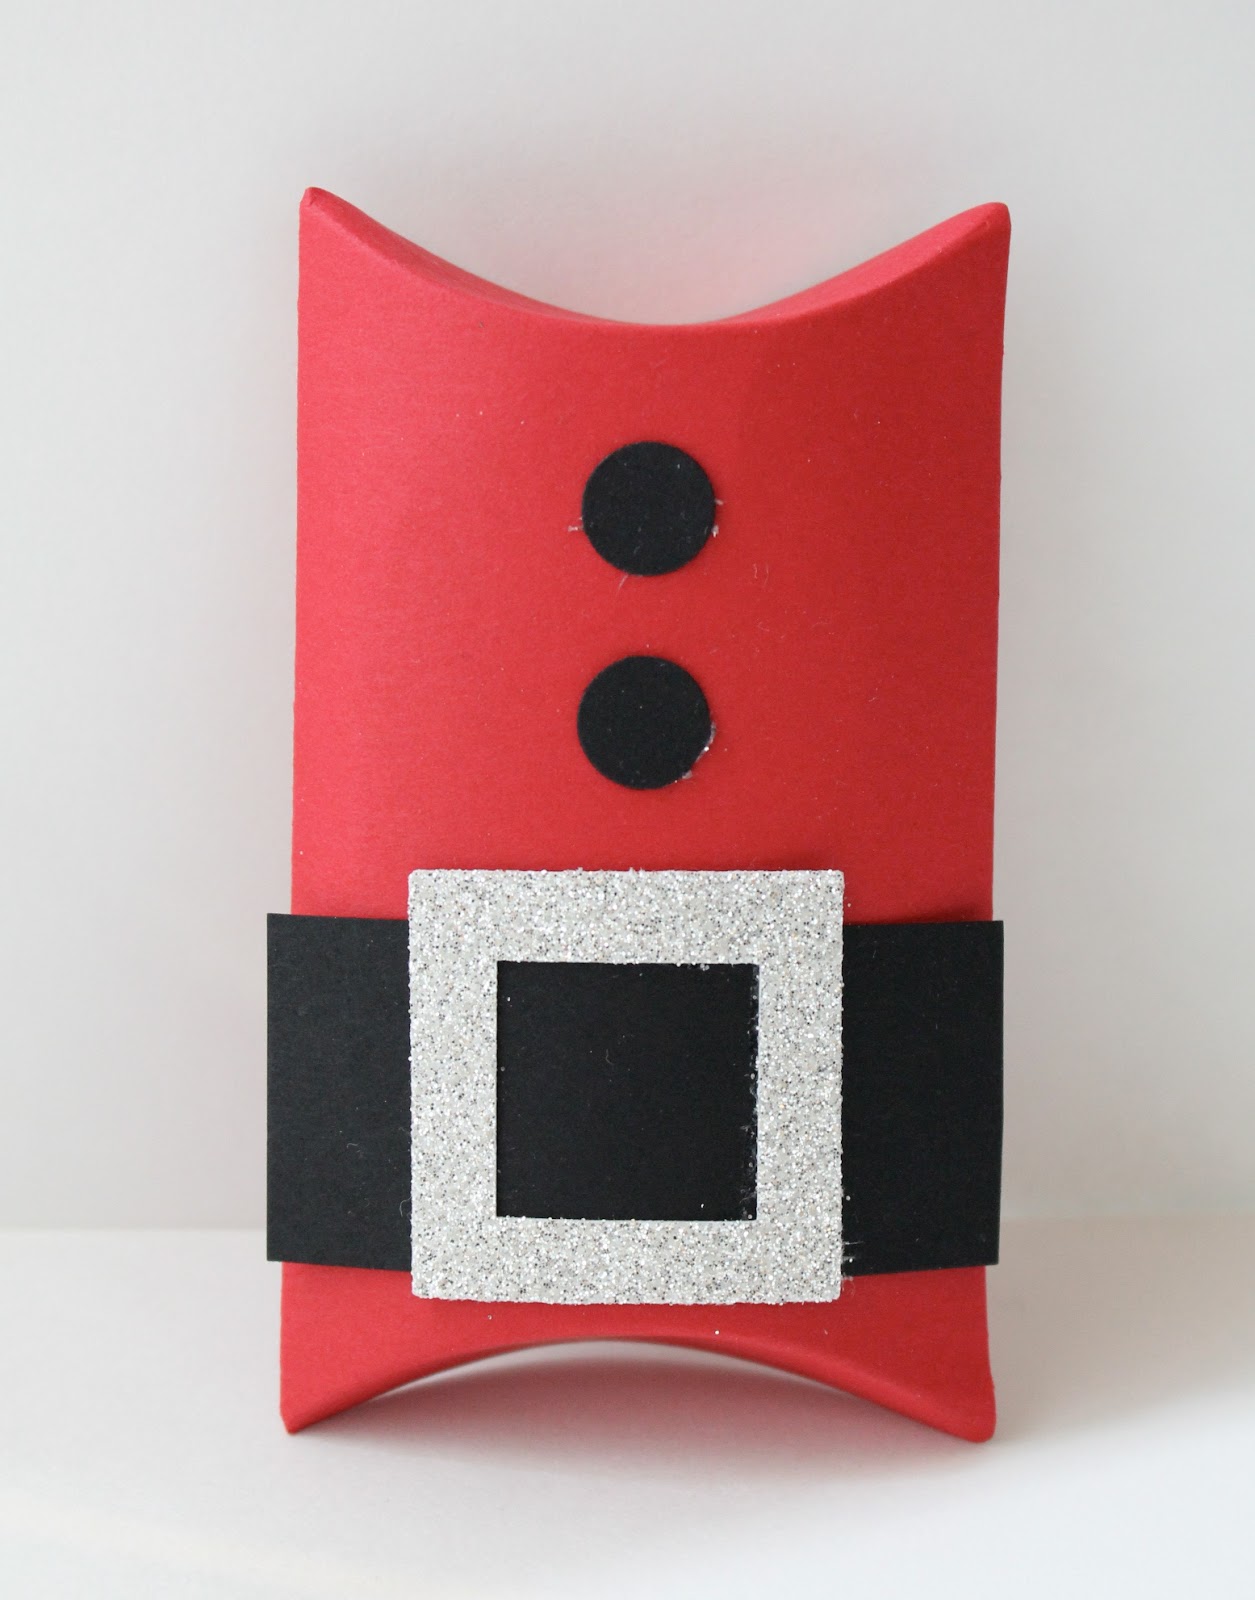
This is what I made for the support staff and teachers that teach specials (Phy Ed, Art, Music, etc.) to my children. They are made using the Pillow Box die for the Big Shot. I put a 1" strip of black on the front and then punched a buckle out of the silver glimmer card stock. Buttons were added with a circle punch. I put candy in each one. The "gift" was nothing big, but I hope they know they are appreciated. I made 16 of these last night!
Below is another idea for this. Cut off the flaps and it can be used to hold silverware for your Christmas dinner. Once again, I was inspired by Heather Summers.
Santa came last night to our house! And, the kids will open their presents from Steve and I tonight. The kids are so excited as you can imagine.
Tuesday, November 22, 2011
Inspiration
This is a card that my friend, Brenda Hukriede made which inspired me to make the snowman card I posted yesterday. This one is larger as it uses the scallop die and larger circles that were made with the circle die for the Big Shot.
Monday, November 21, 2011
Snow!
| "Folded-up" to fit into a 3x3 envelope. |
![]() |
| Snowman "opened." |
Friday, November 18, 2011
Thank You Quilt
This card was made at my Stamp Club/Card Class. The base is made from Pool Party cardstock and then dry embossed using the Big Shot. I punched squares from the Spice Cake designer paper and adhered them to cardstock. It was than ran through the Big Shot using the Top Note Die to cut it. I then put it back through using the Lattice Die embossing folder to give it texture.
Thursday, November 17, 2011
Christmas Gifts Class
I finally have the samples made and pictures taken for the Christmas Gifts Class that will be on Monday, November 21. I will be sending out an email with more information. If you are not on my email list or would like to attend, contact me at karieklundstamps@gmail.com.
These projects are great for packaging gifts for teachers, bus drivers, secretaries, friends, paras at school, co-workers, etc. So, make a list! Okay, now for the projects....
The first is a sour cream container. It can be made with cardstock and then fabric is tied around it for the ribbon as is done with the red and artichoke. Otherwise, it can be made with designer paper as is shown with the ornament designer paper below.
Next up is the snowman box. This is made with the Fancy Favors die cut for the Big Shot and then decorated. For an idea, a hot chocolate packet, marshmallows, chocolate and a candy cane for stirring fit perfectly in this box.
The next project is a stocking made from the Big Shot Stocking die and then embossed. The first picture is more vintage with the red one being more traditional. I like them both depending on the recipient. A gift card as shown with the red one fits nicely in this. There is not a lot of room, so the gift would need to be fairly small.
The last project is a small paper bag. It is made from the packaging that comes in SU! orders. To make it this size, I used the scallop square for the Big Shot. White snowflakes were stamped on and the detail that makes it is the small clothespin that is holding the tag! Hot chocolate packets, candy bars, candy canes, cookies and more can fit in this.
Tuesday, November 15, 2011
Matchbox and Lollipop Flower
I hope all of you had a great weekend. My Christmas stamp-a-stack was on Friday, card class Sunday and Stamp Club last night, so I was busy stamping! It was fun and so nice when others appreciate your work! Below is a matchbox cut from the Matchbox Die. The flower was made using the Stampin' Score. I cut a strip of designer paper 3/4" in width and then scored at 1/4" increments. These flowers can be made any size depending on the width the paper is cute and the width scored. I usually get the question of what would you put in this? It is always a good question. My first response always seems to be candy. Four Hershey nuggets will fit it this matchbox. Other ideas are money, chapstick, and jewelry.
| Side view. |
| Top view. |
Monday, October 31, 2011
Happy Halloween!
Friday, May 20, 2011
Wedding & Big Shot
| card open |
| card closed |
The cards above I made with my friend & fellow demonstrator Brenda Hukriede (check her out if you are in Eau Claire, you won't be disappointed with her as your demonstrator!). Her gals had made this at a class she had and she cut an extra for me to stamp. Isn't it a beautiful card? To make this card, you cut the two hearts with the Big Shot Movers and Shapers die, then send it through the Big Shot with the Polka Dot Embossing Folder. Cut two black heart out using the Heart Embossilit and then make your top hearts with the heart punch for the tux shirt and dress. The tux also has a black punched heart that is folded back for the tux.
Thanks for looking.
Wednesday, May 11, 2011
First Edition Again
Does this card look familiar? It is the same exact layout as my previous post except with different colors and a different flower. I love black/white and black/cream combos. The flower on this one was made with the 1 1/4 inch striped ribbon. There are many tutorials online on how to make a flower like this, but if you would like a picture tutorial, let me know. The ribbon flower adds dimension to the card.
Tuesday, May 10, 2011
First Edition
I was happy to see that the First Edition Paper was carried over from the previous mini! It is a simple background and a great deal for the number of sheets you get in the pack (and if you know me, I love deals!). The cards below are the same except for the color of the main card, since I couldn't decide if I liked baja breeze or rich razzleberry better. I made the scallop from the Tasteful Trims Die and stamped my sentiment on it. The flower was punched and then ran through the Big Shot with the lattice die embossing folder. I stamped a sheet with polkadots and punched it out for the middle of the flower. The leaves were made with the sizzlit leaf die.
Enjoy this beautiful day.....we may reach the 80s!!!:)
Saturday, April 9, 2011
Butterfly Easel Card
I saw a butterfly easel card on Becky Robert's blog. So, I decided to try and figure out how to make it and do a tutorial for you as well! This is made with the Bigz Butterfly Die and will fit into a 3x3 envelope. It not only makes a cute card, but would work great for place cards.
The first step is to cut a card 3 1/2 x 3 1/4 (this is the size with it folded). Place the folded edge not quite to the top of the butterfly on the die, so it will NOT get cut. This will enable your card to open.
After you have the card cut in the shape of a butterfly, take your bone folder and and a ruler to draw a line across the butterfly to fold it. See above picture to see where to fold.
Just to let you know, the Twins did win yesterday! And, the Twins card I made is going to be used for a birthday party my son is going to.
| This is the finished card. |
![]() |
Cut another big butterfly from the die and attach the bottom of the butterfly to the folded edge. This is a picture of the back of the card. 
This is how the front should look with the butterfly adhered. Then, cut a smaller size butterfly and adhere to the large one. Your card is now done! It folds flat, but once open, it can "stand" up! Isn't this cool? I did not come up with this idea, but was so happy to figure out how to do it, that I wanted to share it with you. I'd love to know if you make any!
Just to let you know, the Twins did win yesterday! And, the Twins card I made is going to be used for a birthday party my son is going to.
Wednesday, April 6, 2011
Butterflies #2
Here are some butterfly cards! Can you tell I love my butterfly Big Shot die? and that I'm ready for summer?! This card is a CASE, but I do not remember the original designer, so if it is you, let me know and I would love to give you credit. This card is made by running whisper white card stock through the big shot using the elegant lines embossing folder. Then cut butterflies using the Butterfly Bigz Die. I cut the larger butterfly with vellum and a smaller one with designer paper. Don't you love the look with the vellum? I adhered the butterflies with glue dots, and added rhinestones and pearls to the middle of the butterfly. This card is very simple & clean....Love it!

Monday, April 4, 2011
Welcome Spring!
I really have been stamping, but I just haven't posted to the blog!
We have had a looong winter here in Minnesota, but signs of spring are finally here. Almost all of our snow has melted (I'm just hoping it doesn't snow again!) and the kids even got a little burnt from the sun on Saturday. Yes, I survived another winter:) I am not a winter person at all and probably would not live here if my family didn't!
Anyway, on to today's card. These cards are the same, just different color. The card base was dry embossed using the tulip embossing folder. I then cut a strip of designer paper and punched the bottom edge with the eyelet border punch. I then applied sticky tape on top of the designer paper and "folded" the ribbon binding. The butterfly die was used for the butterflies with pearls adhered to the middle. The blue one I left blank, so I can add a sentiment later.
These two cards will be made at my upcoming stamp-a-stack.
We have had a looong winter here in Minnesota, but signs of spring are finally here. Almost all of our snow has melted (I'm just hoping it doesn't snow again!) and the kids even got a little burnt from the sun on Saturday. Yes, I survived another winter:) I am not a winter person at all and probably would not live here if my family didn't!
Anyway, on to today's card. These cards are the same, just different color. The card base was dry embossed using the tulip embossing folder. I then cut a strip of designer paper and punched the bottom edge with the eyelet border punch. I then applied sticky tape on top of the designer paper and "folded" the ribbon binding. The butterfly die was used for the butterflies with pearls adhered to the middle. The blue one I left blank, so I can add a sentiment later.
These two cards will be made at my upcoming stamp-a-stack.
Subscribe to:
Posts (Atom)